

4.
Mac® Installation and Programming of CodeWarrior®
This chapter explains the installation procedure for the CodeWarrior Professional software package on Mac® computers. The chapter also provides you with an example program to create a console application using CodeWarrior. The topics in this chapter are:
Mac System Requirements

CodeWarrior requires the following hardware and software setup.
Table 4.1 Mac requirements
Installing CodeWarrior on Mac

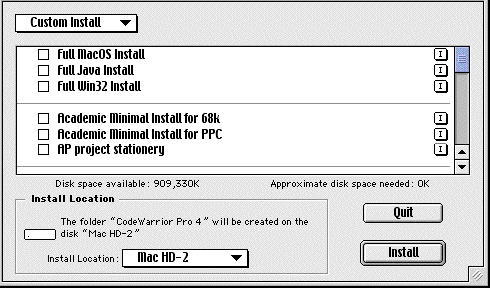
The installation software on the CodeWarrior Professional Mac Tools CD-ROM installs all the necessary components you need to use CodeWarrior. The installation software presents the options listed in Table 4.2.
Table 4.2 Installation options for Mac
This option
|
Installs these items on your hard disk
|
|---|
Full Mac Install
|
all CodeWarrior development tools, compilers, linkers, libraries, and help files for developing software for Mac OS
|
Full Java Install
|
all CodeWarrior development tools, compilers, linkers, libraries, and help files for developing software for Java VM (Virtual Machine)
|
Win32/x86 Install
|
all CodeWarrior development tools, compilers, linkers, libraries, and help files for developing software for the Microsoft® Win32 API running on Intel®-compatible x86 processors
|
Academic
Minimal Install for 68K
|
only essential CodeWarrior development tools, compilers, linkers, libraries, and help files for developing software for Mac OS 68K
|
Academic
Minimal Install for PPC
|
only essential CodeWarrior development tools, compilers, linkers, libraries, and help files for developing software for PPC
|
Custom Options
|
Enables you to customize installation and choose options based on project requirements.
|
Before You Install

Before installing the software on your Mac OS computer, you should:
1. Read the CodeWarrior Software License.
Make sure you understand and agree with the "Metrowerks Software License Agreement" before installing the software.
2. Make sure your software package is complete.
This software package should contain:
1. QuickStart Professional guide (optional on some products)
2. A CodeWarrior Professional Mac OS Tools CD
3. A CodeWarrior Professional Reference CD
4. A registration card
5. Geekware catalog
 NOTE
NOTE
If any of these items are missing, contact your local distributor or Metrowerks sales (sales@metrowerks.com). See "Metrowerks Support" for more information.
3. Make sure your computer system meets the specified hardware and software requirements.
See "Mac System Requirements".
4. Quit all running applications before installing.
To avoid installation problems, it is highly recommended that you quit all running applications before running the Metrowerks software installer.
Figure 4.1 CodeWarrior installer options

 WARNING!
Be sure to turn off all virus protection and file sharing before running the installer.
 TIP
TIP
To get more information about an option, click the  button to the item's right. A dialog will appear displaying the option's size and content.
Mac Installation Procedure

To install CodeWarrior Professional on your Mac computer:
1. Launch the CodeWarrior installation software.
Insert the CodeWarrior Professional Mac OS Tools CD-ROM into your CD-ROM drive and wait for the CD's icon to appear on the computer's desktop.
Double-click on the CD's icon. Then double-click the file named CWPro 4 Tools Installer in the CD's top folder to launch the application and display the welcome screen.
Click Continue to display the software license for CodeWarrior Professional.
2. Read the software license.
If you agree with the license, click Accept to display the release notes message.
3. Read the release notes.
When the release notes appear, please read them. Then click Continue to display the options window. For information on CodeWarrior's Y2K compliance, please read the note on "CodeWarrior Year 2000 Compliance."
4. Select a destination for the files.
Choose location to install CodeWarrior on your hard disk using the Install Location popup menu (Figure 4.2).
Figure 4.2 Install Location

Choose the Select Folder from the popup menu to install to a specific folder on the currently selected disk drive. Click Switch Disk to choose the next available disk drive.
5. Choose your installation options.
See "Installing CodeWarrior on Mac" for descriptions of the installable items. After choosing the components to place on your computer, click Install. The CodeWarrior installation process may take several minutes.
6. After installation, read the release notes.
If the installation software recommends restarting your computer, do so to make sure any system extensions are properly initialized before using CodeWarrior. Then please read the file "What's New" for the latest release information, and refer to the CW Release Notes folder for additional release details.
7. Install CodeWarrior documentation and examples.
Repeat steps 1 through 6 using the "CWPro Reference Installer" application on the CodeWarrior Professional Reference CD to install the CodeWarrior documentation, programming examples, third-party books, and other programming goodies.
 TIP
TIP
Some of the documentation on the exists in uncompressed format to allow direct viewing on the CD.
8. Install Microsoft Internet Explorer.
A browser, like Microsoft Internet Explorer (MSIE) is required to access the HTML documentation. If you don't already have a browser on your hard disk, the MSIE installer can be found in the Documentation:Viewers folder on the CodeWarrior Professional Reference CD.
9. Install Adobe Acrobat.
To read the PDF documentation, Adobe's Acrobat Reader must be installed on your hard disk. If you don't already have Acrobat on your hard disk, launch its installation software in the Documentation:Viewers folder on the CodeWarrior Professional Reference CD.
What's Installed

Once the installation software is finished, you will have a Metrowerks folder installed on your hard disk. Inside will be all the components you chose during installation. See the documentation for information on what has been installed.
Creating a Mac Application

With CodeWarrior up and running on your Macintosh, follow the steps below to create a simple console application.
1. Choose File`New Project.
The New Project window and a list of options appear.
2. Click the triangle on the left.
A submenu appears with a sub-stationery list.
3. Select "Std C Console Multi-Target" from the stationery list.
The "Std C Console Multi-Target" stationery is located in the MacOS-->C_C++->Standard Console folder. Use the disclosure triangles to view the contents of the stationery subfolders.
4. Click OK.
The Name New Project As window appears.
5. Enter the project name.
Type in a project name and give it the .mcp extension. This enables the IDE to recognize the project as a CodeWarrior project. Also, use the standard navigation controls to specify the folder where the project file should be saved.
6. Click Save.
The Name New Project As window closes and a new project based upon the chosen stationery is created.
7. Choose File `New.
A new empty editor window appears.
8. Enter the example code.
In the empty editor window, enter the following source code:
/* hello.c */
#include <stdio.h>
main() {
printf("Hello Metrowerks\n");
return 0;
}
 NOTE
NOTE
A hello.c file exists in the new project. Please ignore the existing file and proceed with the steps to create a new file with the example code.
9. Choose File `Save.
The Save dialog box appears. Name the source file Hello.c and click Save. The .c extension enables the CodeWarrior IDE to recognize it as a source code file.
10. With the editor window frontmost, choose Project`Add Window.
The Add Files window appears. Use this window to specify which build targets should use the Hello.c file.
11. Click OK.
The Hello.c file is added to all build targets in the project window.
12. Select Helloworld.cp in the project window.
The Helloworld.cp filename is highlighted.
13. Choose Project`Removing Selected Items.
The Helloworld.cp file is deleted.
14. Choose Project`Run.
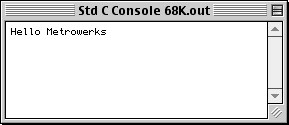
The project is compiled, linked, and run (Figure 4.3).
Figure 4.3 Console output for Mac.

Congratulations! You just created a program using the CodeWarrior IDE on your Mac. For information on programming resources, please refer to "CodeWarrior Documentation."


Visit the Metrowerks website at: http://www.metrowerks.com
For assistance contact Metrowerks Technical Support at: support@metrowerks.com
Copyright © 1999, Metrowerks Corp. All rights reserved.
Last updated: May 25, 1999


 NOTE
NOTE

 WARNING!
 TIP
TIP
 button to the item's right. A dialog will appear displaying the option's size and content.

 TIP
TIP
 NOTE
NOTE


